This card was made a few months ago using the Groovi system by Claritystamp, but I couldn't share it until today as it was made for my Mum's 75th birthday today. It was the first time that I had made a card using this system and, although I made a minor error, I am really pleased with the outcome.

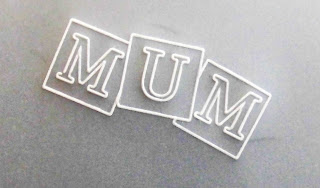 I used an A5 piece of plain parchment and with the number 1 ball tool traced out the triple letter box and the letters MUM from the Groovi base plate. The pencil marks show where the circle and butterfly wings will intersect with the word. Just like stamping, you need to work from front to back with the Groovi system. Instead of masking off a stamp, you just make sure that you don't go through any previously scored images with the next layer of line art.

 I then used the butterfly wreath plate and outlined the whole design with the number 1 ball tool, leaving the Mum text boxes intact.
 Once complete, I switched to the Nested Squares plate and traced the outermost and third square in 'behind' the image that I had already completed.
 I wanted to add further interest, so used the diagonal Basic Piercing Grid plate with the number 2 ball tool to add 'dots' inside the square frame and the inner circle. At one point the parchment slipped slightly and I was unable to line it up again exactly, which is why I ended up using black ribbon across two of the corners to disguise the resulting error.
 Having finished the line art, it was time to start on the white work. Starting with the number 4 ball tool, I added emphasis to some of the flowers, the sentiment and the body of the butterfly. I worked too quickly on several of the flowers and didn't get as soft an effect as I wanted, as I didn't allow the parchment to rest between sessions.
 When it came time to mount the parchment, I was undecided whether to add any colour first. In the end I decided just to add colour to the butterfly, which I did from the back using Distress Markers in Black Soot and a mixture of Oranges layered up. The whole piece was trimmed square slightly larger than the outermost line art and added to a piece of orange card of the same size using three black eyelets in the centres of three of the flowers. Black ribbon across the top right and bottom left corners also helped to secure the parchment to the backing card as well as helping to obscure the fault in the frame.
The orange card with the parchment attached was matted onto a larger piece of black and then stuck to a pre made 7" x 7" white card. I was really pleased with my first attempt with the Groovi system and have been hooked ever since.

 I used an A5 piece of plain parchment and with the number 1 ball tool traced out the triple letter box and the letters MUM from the Groovi base plate. The pencil marks show where the circle and butterfly wings will intersect with the word. Just like stamping, you need to work from front to back with the Groovi system. Instead of masking off a stamp, you just make sure that you don't go through any previously scored images with the next layer of line art.
 I then used the butterfly wreath plate and outlined the whole design with the number 1 ball tool, leaving the Mum text boxes intact.
 Once complete, I switched to the Nested Squares plate and traced the outermost and third square in 'behind' the image that I had already completed.
 I wanted to add further interest, so used the diagonal Basic Piercing Grid plate with the number 2 ball tool to add 'dots' inside the square frame and the inner circle. At one point the parchment slipped slightly and I was unable to line it up again exactly, which is why I ended up using black ribbon across two of the corners to disguise the resulting error.
 Having finished the line art, it was time to start on the white work. Starting with the number 4 ball tool, I added emphasis to some of the flowers, the sentiment and the body of the butterfly. I worked too quickly on several of the flowers and didn't get as soft an effect as I wanted, as I didn't allow the parchment to rest between sessions.
 When it came time to mount the parchment, I was undecided whether to add any colour first. In the end I decided just to add colour to the butterfly, which I did from the back using Distress Markers in Black Soot and a mixture of Oranges layered up. The whole piece was trimmed square slightly larger than the outermost line art and added to a piece of orange card of the same size using three black eyelets in the centres of three of the flowers. Black ribbon across the top right and bottom left corners also helped to secure the parchment to the backing card as well as helping to obscure the fault in the frame.
The orange card with the parchment attached was matted onto a larger piece of black and then stuck to a pre made 7" x 7" white card. I was really pleased with my first attempt with the Groovi system and have been hooked ever since.
No comments:
Post a Comment