Mission Inspiration November 2016
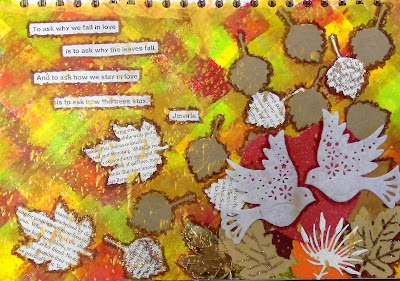 I've had a lovely relaxing day, crafting in the company of a good friend, working on the November mission for Mission Inspiration. I didn't have a clue where I was going when I started, but once again, everything came together and I love the finished page. The only pieces which I had to die cut/punch out were the book text leaves and the heart behind the doves; everything else came out of my stash. The quote is one I found online having completed step 7 and which helped me decide on my focal image.
 |
| Step 1 |
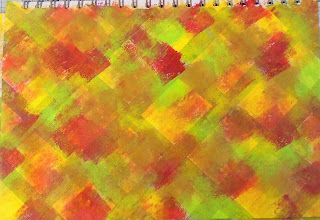
Step 1: Cover your page with a paper lattice. I chose a piece of 12" x 12" from my stash and cut it into 1.5cm strips, gluing them diagonally across my blank page. I chose a green patterned paper, as I knew that I would be adding collage elements from nature later in the process.
 |
| Step 2 |
Step 2: Add a thin coat of white gesso or paint. This was a quick job; I thinned some Pebeo white gesso with water before adding a wash over the whole page.
 |
| Step 3 |
Step 3: Make marks with warm tonal colours. For this step I used sponges on sticks from a 25 piece value pack by Royal Langnickel and some Reeves Acrylic paint in Medium Yellow, Yellow Ochre, Lime Yellow and Rose Madder. I tapped each sponge into the paint and then randomly onto the page on the diagonal to echo the lattice pattern.
 |
| Step 4 |
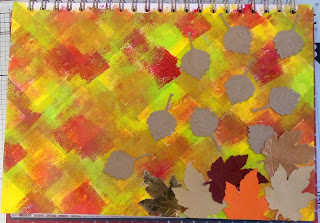
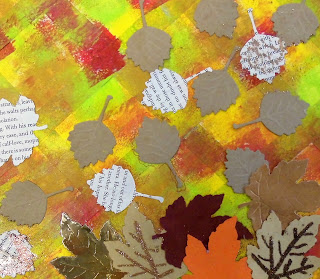
Step 4: Add collage elements from nature. I knew that I had some punched and embossed maple leaves in my stash of die cuts, but I had forgotten the kraft card leaves that I also found in my stash. I seized on the idea and arranged them as if they were falling off the trees onto the ground.
 |
| Step 5 |
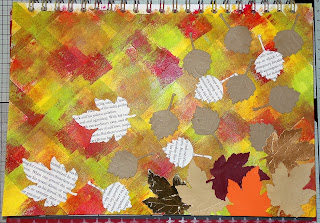
Step 5: Add book text fragments. I wanted to keep the theme going, so chose to die cut and punch and emboss some further leaves, this time from a biography of Byron which I had bought in a sale at my local library, specifically for the purpose of using for art journaling.
 |
| Step 6 |
Step 6: Add sequins, glitter or mica. I must admit that this is the only step that I wouldn't have included if it had not been in the step by step instructions. I am not a big glitter and bling crafter, so I kept the glitter to a minimum, adding two different colours to some of the lighter coloured leaves.
 |
| Step 7 |
Step 7: Add doodles, scribbles or zentangles. Out came my trusty Caput Mortuum Pitt artist pen to add scribbles around all the leaves. I didn't like my first attempt, so kept adding scribbles until I was happy.
 |
| Step 8 |
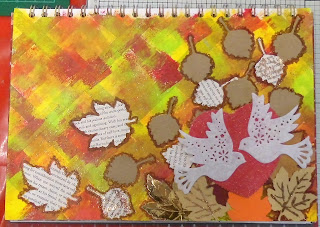
Step 8: Add a focal image. I really didn't know what to do at this point, so decided to look for a quote (step 9) about leaves which might give me an idea. The quote which I found was about love, so I found some white felt doves and cut a heart from red sparkly card to add behind them.
 |
| Step 9 |
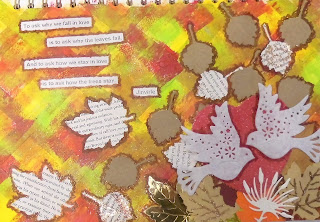
Step 9: Add journaling, quote or phrase. The quote which I found was one which I had never come across before, but which fits the theme of the page beautifully. I also decided to add an additional leaf below the doves to balance out the bottom right and top left corners or the page.
 |
| Step 10 |
Step 10: Add drips or splashes of gold. For this final step I used watered down Studio Dyna Acrylic paint by Pebeo in Rich Iridescent Gold with my Tim Holtz splatter brush. Unfortunately I caught one of the doves so had to use a water brush and kitchen towel to remove as much as I could. I also added scribbles around the doves and the quote to bring the whole page together.
 I've had a lovely relaxing day, crafting in the company of a good friend, working on the November mission for Mission Inspiration. I didn't have a clue where I was going when I started, but once again, everything came together and I love the finished page. The only pieces which I had to die cut/punch out were the book text leaves and the heart behind the doves; everything else came out of my stash. The quote is one I found online having completed step 7 and which helped me decide on my focal image.


No comments:
Post a Comment